Quiz Builder
https://youtu.be/oFzJBrItB9k
To get started with Face Age, log into your Shopify store and access the Face Age page from the sidebar.
The first step is to use Quiz Maker.

Here you can use ready templates or create a new template. You can also edit and customize ready templates to suit your needs. For start click at the “Add Section” button and then use the right sidebar options to build your quizzes.

From the right sidebar you can add different kinds of options to your quiz.
Title
The first option is the Title section, which lets you select a title for your question.
Paragraph
The next option is Paragraph, which lets you add explanations for the question and provide the necessary information to the user.
Text Box
The third option is Text Box, which lets you create questions that require the user to enter information such as name, email, or contact number.
You can set your question by clicking on the pencil icon in this section.

There are several customization for a question.
The first one is the name of the question, which is automatically filled in, but we suggest choosing a relevant name for better usability. This name is not displayed to the user and is used for the next steps that will be explained below.

Note: This name cannot be edited after submitting the question.
The next option is the email option. As you can see, by adding the email field, you will have a box that you can use to collect your contacts’ emails.
Important note: In the edit section, you cannot change the email name.
Important note: that you can only create one email question. To avoid any mistakes in collecting your customers’ emails, avoid creating two separate email questions.

Image:
You can use this option to create an intro for your clients. By adding this section to your site, you can upload your desired photo along with a title or a paragraph. You can choose a name and title for your photo and specify whether it should be left, center, or right aligned. The image field must be a file of type: JPG, JPEG, BMP, PNG.
Select
The next option on the right sidebar is Select.

By default, three options are shown as examples. You can remove or edit them and add your own by typing the desired text and clicking the plus sign. This type of question allows users to select only one option. Examples include gender, age range, and skin type. And you can add a photo next to the options to make the questions more understandable for your audience.

Here, you can set the display of the options as below by selecting the List option or put them together by selecting the Normal option.

Multi Select
The last type is Multi Select. This type of question allows the user to select more than one option.
Questions such as skin problems, allergies, etc. are asked in this type of question.

Customizations
Finally, after setting the sidebar, we go to the main page of questions. You can customize the display type by clicking on each question.

Start personalizing by clicking the pencil icon above each question, which usually is in the title section.
Background
The next section is Background, where you can choose your desired color or image for the background.

In the next box, you choose the display position of the question box in this section. It can be in top, middle or bottom of section.

Here you can set conditions for the questions. For example, if you ask the user if they have a specific skin problem, and if they answer yes, you want to ask about the details of the problem.
If the answer is no, the question “What problem?” will not be displayed.
To do this, you need to create a new section for the question “What problem”. From the Condition section, select the name of the previous question, then set the condition to equal or not equal, and use the options of the previous question as the value.
In the previous example, we need to select the question name Skin problems, set the condition to equal, and set the value to no. In this case, people who answered no to the question “Skin problems” will not see the question “What problem”.

Quiz Display After Analysis Option

In the last question, which is present by default and you cannot delete that section, you will see the option Quiz Display After Analysis.
This section is generally used to add a question after or before displaying the analysis results, which is usually used to receive information such as email or user name and number.
If you enable this option, your user will see the question after performing their skin analysis and by pressing the Show Products button. If you uncheck this option, the user will see the question before displaying the analysis results.
Note that this option is only active for the last section and does not affect the display order of all questions.


Finalize
This section will be saved automatically.
Data Policy for Saving Quiz Results
By using the Face Age quiz, you agree to the following data policy regarding the handling of quiz results:
- Email Input:
- If the quiz includes an email input field, Face Age will connect to your Shopify customers database.
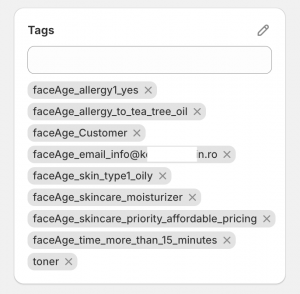
- The quiz responses will be added as tags to the customer profile associated with the entered email.
- If no existing customer is found with the entered email, Face Age will create a new customer in Shopify and assign the appropriate tags based on the quiz answers.
- No Email Provided:
- If the quiz does not include an email input or user skip the question, no data will be stored. The answers provided will only be used temporarily to make recommendations for the user without being tied to a specific profile.


